Transitioning to Azure cloud authentication – Part 2

Conditional Access

Now that we’ve gone over some a couple basics, I wanted to go through some of the features Azure AD has built in which not only blow on-premise AD away, but also show why a push to utilize it over it’s predecessor is vital for the modern workspace.

The modern security perimeter now extends beyond an organization’s network to include user and device identity. Organizations can use identity-driven signals as part of their access control decisions.

Conditional Access brings signals together, to make decisions, and enforce organizational policies. Azure AD Conditional Access is at the heart of the new identity-driven control plane.

I’ve especially seen post-Covid, with the workspace being more dispersed, the two goals I see most commonly requested are to:

  • Empower users to be productive wherever and whenever
  • Protect the organization’s assets

In my opinion, using Azure AD Conditional Access policies to apply the right access controls when needed is one of the strongest controls available for keeping the organization secure.

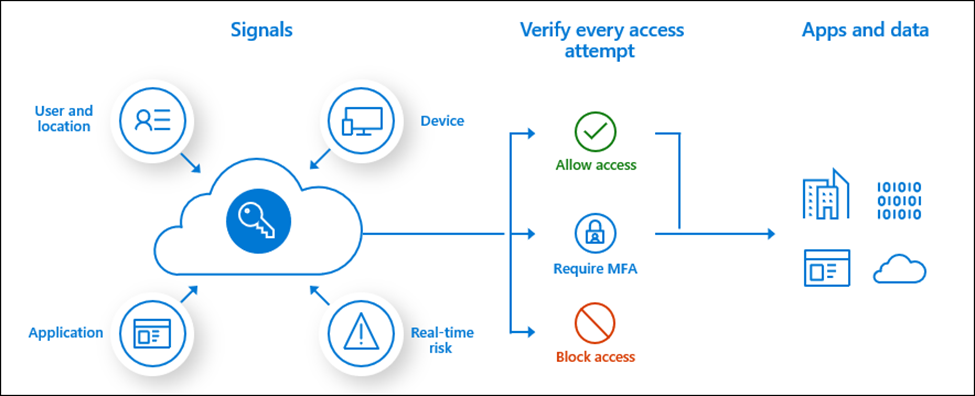
Signals that Conditional Access can use when making decisions include:

  • User or group memberships
    • Note: Dynamic memberships are super powerful here, drastically lowering the support overhead with utilizing this control!
  • IP Location info
  • Specific Device
  • Based on application
  • A.I. – like, by using real-time and calculated risk detection
    • Note: This one is cool, as integration with AzAD Identity Protection allows the identity of risky sign-in behavior, and you can then force users to go through some of the options talked about in Part 1

Conditional Access is very powerful, however, I would recommend that it initially be implemented in “report only” mode. – Thankfully, for many obvious reasons, an excellent option.

Entitlement Management

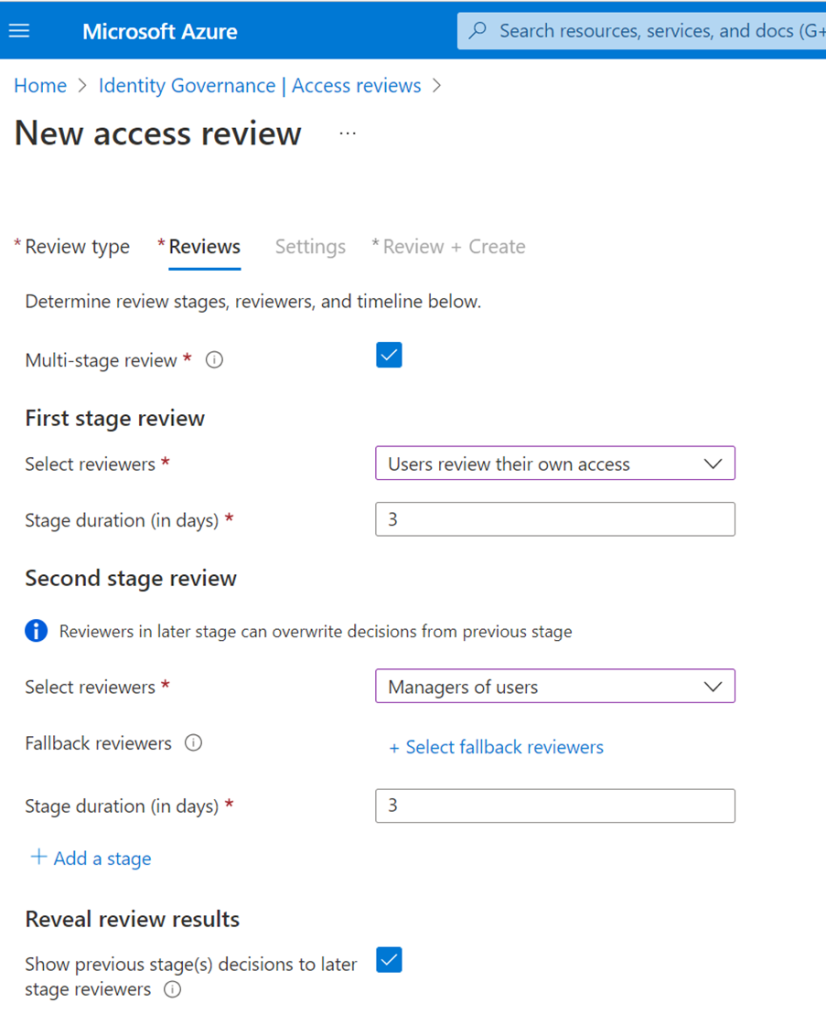
Continuing in the same theme, either static, or automatic assignments of access packages can be created in Entitlement Management, which now include multi-stage reviews.

Access reviews can be built in sequential stages, each with their own set of reviewers and configurations, making it easy to design more efficient reviews for the resource owners and auditors by reducing the number of decisions each reviewer is accountable for.

Note: In the following sample, I have a third party application added as “Application”, the reason it shows up is because it is an Enterprise App registered in my Azure tenant, one can only imagine the possibilities here!

Up to three stages can be specified, in addition, you can define whether earlier stage decisions should be revealed to later-stage reviewers. 

Automatic assignment of access policies

Azure AD now adds and removes users’ access across groups, Teams, SharePoint sites, and applications as their attributes change (such as when someone joins, moves between departments, etc.). The inclusion of this policy in an access package simplifies managing at scale; users don’t need to make requests, which not only ensures their access doesn’t remain longer than necessary, but also does so without the need for administrative interaction when someone moves teams.

Here’s a screenshot example for a policy I’ve got

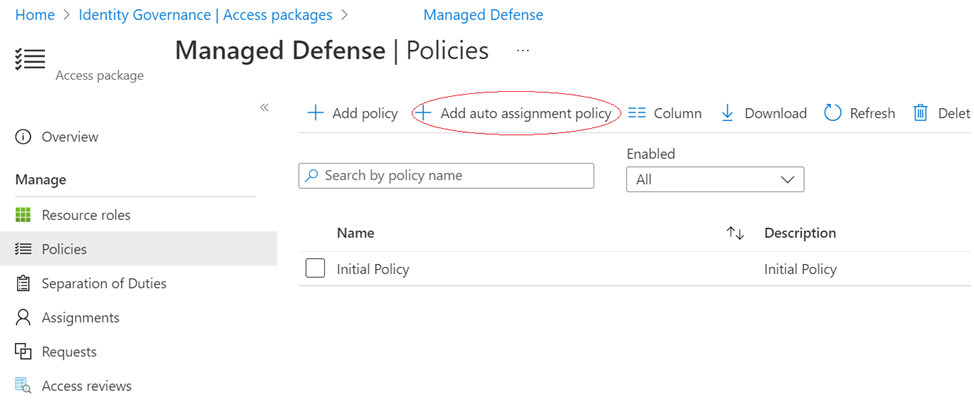
In this example, the rule is based on the attributes of the user, in this case department. Azure AD will automatically begin creating resource assignments for those users who meet the rule, without the need to request.

In addition to what be done with dynamic groups, we can also use entitlement management with automatic assignment policies for:

  • Managing access across multiple resources, including applications, SharePoint Online sites, existing Azure AD groups and Teams, and groups that are provisioned to on-premises AD.
  • Managing access with a combination of policies to have both rules (for instance, members in a department) and exceptions so that the exceptions can be regularly reviewed and removed, if no longer needed
  • More automation of tasks across applications through entitlement management’s custom extensions, by running workflows when users receive or lose assignments

Cybersecurity Architect Expert certification

This weekend I successfully passed the SC-100 certification, with it have now achieved my second Expert level cert, the Cybersecurity Architect certification from Microsoft.

Learned a ton, and looking at the exam score, I overstudied on governance, but that’s what I’m interested in, and yes, it’s helped a ton with furthering my knowledge with Azure security infrastructure and design!

Transitioning to Azure cloud authentication – Part 1

This series of articles is to document steps to be taken to transition from an on-premise Active Directory footprint, and migrate the workloads to Azure AD.

A typical migration has the following stages:

  • Discovery: Find out what is currently in the environment
  • Pilot: Deploy new cloud capabilities to a small subset of users, applications, and devices
  • Scale Out: Expand the pilot to complete the transition
  • Cut-over: Stop using the on-premises authentication

Users and Groups

Microsoft highly recommends a passwordless environment, due to as is depicted in the following graphic, is both highly secure, and convenient.

In my experience, users correctly following secure practices either make or break security initiatives, thus, in my opinion, convenience is crucial

Industry authentication standards rely on one of the following:

  • Something you Know:
    • Passwords are great, but unless a vault is used, it is common to use the same, or variation for many personal accounts. Highly vulnerable in modern times, as environments are often compromised, with credentials getting exposed to public sites. The equivalent of writing credentials down on paper and other people finding it.
  • Something you Have:
    • Removes the problem of forgetting something you know, but is vulnerable to the object being lost or stolen.
  • Something you Are:
    • Much harder to lose a fingerprint than a wallet, however, while this is getting better, historically, biometric sensors can be fairly expensive (cost and support) and have accuracy issues.

Due to the fact each authentication methods have their vulnerabilities, a combination of them is much stronger, hence the modern term “Multi-Factor Authentication” (MFA)

Here’s an example of using the Authenticator App as a convenient multi-factor authentication option in addition to a password.

The Authenticator App turns any iOS or Android phone into a strong, passwordless credential. Users can sign in to any platform or browser by getting a notification to their phone, matching a number displayed on the screen to the one on their phone, and then using their biometric (touch or face) or PIN to confirm.

Passwordless authentication using the Authenticator app follows the same basic pattern as Windows Hello for Business. It’s a little more complicated as the user needs to be identified so that Azure AD can find the Authenticator app version being used:

  1. The user enters their username.
  2. Azure AD detects that the user has a strong credential and starts the Strong Credential flow.
  3. A notification is sent to the app via Apple Push Notification Service (APNS) on iOS devices, or via Firebase Cloud Messaging (FCM) on Android devices.
  4. The user receives the push notification and opens the app.
  5. The app calls Azure AD and receives a proof-of-presence challenge and nonce.
  6. The user completes the challenge by entering their biometric or PIN to unlock private key.
  7. The nonce is signed with the private key and sent back to Azure AD.
  8. Azure AD performs public/private key validation and returns a token.

Password Self-Service

Until an MFA environment is in place, migrating to Azure’s password self-service (SSPR) gives users the capability of managing their own password resets, which not only greatly helps with the “convenience” point I made above, but in most cases, tremendously decreases help desk support calls.

The following authentication methods are available for SSPR:

  • Mobile app notification
  • Mobile app code
  • Email
  • Mobile phone
  • Office phone (available only for tenants with paid subscriptions)
  • Security questions

Users can only reset their password if they have registered an authentication method that the administrator has enabled.

On-premises integration

With a hybrid environment, first install and configure the sync agent to be capable of enabling password writeback, once that is complete, you can configure Azure AD Connect to write password change events back from Azure AD to the on-premises directory.

In addition, the following options are available:

  1. Users can unlock accounts without resetting their password
  2. Password filters for on-premises Active Directory

Specialized role permissions – Locking down standard Azure infrastructure

Possibly due to specific governance needs, or perhaps maintaining a specific infrastructure in your cloud environment, you might want to lock out standard build capability for a group of users.

In the following example, I had a request to remove the ability of creating new Resource Groups in Azure to most users regardless of authorization levels, here is the example of how to do so with Microsoft Graph permission sets.

I created a custom Azure role that defined what can be done, and what can’t be done, looking at a the empty role JSON file, you can see there are “Actions” and “NotActions” sections:

{
  "Name": "",
  "Id":,
  "IsCustom": true,
  "Description": "Base Role file",
  "Actions": [
    ""
  ],
  "NotActions": [
    ""
  ],
  "AssignableScopes": [
    ""
  ]
}

The fields we’re going to pay attention to are the Actions, NotActions, and AssignableScopes.

Step 1: Determine the resource providers that map to Azure services.

With this example, we are targeting Resource Groups, so we will use:

Microsoft.Resources/subscriptions/resourceGroups

Step 2: Find the available permissions. With this case, we want to restrict creating or modifying resource groups, so it makes sense to add to the deny section the “write” permission.

Microsoft.Resources/subscriptions/resourceGroups/write

Step 3: Assign it to the appropriate scope. A Resource Group is created in a subscription, therefore that’s where you’d define the scope:

/subscriptions/bf384112-966c-4eb5-xxxx-b495c90xxxx

Putting it all together, your JSON file will look something like this:

{
  "Name": "Deny RG Create",
  "Id": null,
  "IsCustom": true,
  "Description": "Disable New Resource Group creation",
  "Actions": [
    "Microsoft.Resources/subscriptions/resourceGroups/read"
  ],
  "NotActions": [
    "Microsoft.Resources/subscriptions/resourceGroups/write"
  ],
  "AssignableScopes": [
    "/subscriptions/bf384112-966c-4eb5-xxxx-b495c90xxxxx"
  ]
}

Once you’ve created the role definition, import it into your Azure subscription and assign the role to the necessary users, they’ll get the “You do not have permissions to create resource groups under subscription” message when trying to create a new group.

The FIP-FS “Microsoft” Scan Engine failed to load. PID: 25212, Error Code: 0x80004005. Error Description: Can’t convert “2201010009” to long.

Happy New Year from Microsoft to Exchange on-premise users!

Due to a pretty bad MSExchange Antimailware update that was sent out, As a result of bad code, the MSExchange Antimalware engine broke, and Exchange will not process email.

The following errors are found in the event viewer of the affected systems:

Event 5801:

The anti-malware agent encountered an error while scanning. MessageId: <guid@domain.net> Message sent: 1/1/2022 5:05:21 PM From: <> Size: 12503 Bytes Error: Microsoft.Filtering.ScanAbortedException: Exception of type 'Microsoft.Filtering.ScanAbortedException' was thrown.
   at Microsoft.Filtering.InteropUtils.ThrowPostScanErrorAsFilteringException(WSM_ReturnCode code, String message)
   at Microsoft.Filtering.FilteringService.EndScan(IAsyncResult ar)
   at Microsoft.Exchange.Transport.Agent.Malware.MalwareAgent.OnScanCompleted(IAsyncResult ar)
Event 5300:

The FIP-FS "Microsoft" Scan Engine failed to load. PID: 19120, Error Code: 0x80004005. Error Description: Can't convert "2201010009" to long.
Event 1106:

The FIP-FS Scan Process failed initialization. Error: 0x80004005. Error Details: Unspecified error

The current fix is to disable the anti-malware scan module with the following Exchange system script:

Disable-AntimailwareScanning.ps1

https://docs.microsoft.com/en-us/Exchange/antispam-and-antimalware/antimalware-protection/antimalware-protection?view=exchserver-2019

1/3/2022 Update:
After several days the issue came back. Apparently, disabling the anti-mailware scanning does not actually resolve it, possibly the mail processing still goes through the bad engine! Microsoft has now released an article with the corrected procedure of resetting the engine with the following article: https://techcommunity.microsoft.com/t5/exchange-team-blog/email-stuck-in-exchange-on-premises-transport-queues/ba-p/3049447

To reset the engine, run the following script: https://aka.ms/ResetScanEngineVersion

If unavailable, here is the code:

[CmdletBinding()]
param (
    [switch]$Force
)

begin {
    #region Remoting Scriptblock
    $scriptBlock = {
        #region Functions
        function Get-ExchangeInstallPath {
            return (Get-ItemProperty -Path Registry::HKEY_LOCAL_MACHINE\SOFTWARE\Microsoft\ExchangeServer\v15\Setup -ErrorAction SilentlyContinue).MsiInstallPath
        }

        function StopServicesAndProcesses {
            Write-Host "$($env:COMPUTERNAME) Stopping MSExchangeTransport, FMS, and updateservice..."
            Stop-Service FMS -Force
            $updateservice = Get-Process updateservice -ErrorAction SilentlyContinue
            if ($null -ne $updateservice) {
                $updateservice | Stop-Process -Force
                Start-Sleep -Seconds 2
                $updateservice = Get-Process updateservice -ErrorAction SilentlyContinue
                if ($null -ne $updateservice) {
                    Write-Warning "$($env:COMPUTERNAME) Could not end process updateservice.exe. Please end this process and rerun the script."
                    return $false
                }
            }

            return $true
        }

        function RemoveMicrosoftFolder {
            Write-Host "$($env:COMPUTERNAME) Removing Microsoft engine folder..."
            $installPath = Get-ExchangeInstallPath
            if ($null -ne $installPath) {
                $microsoftFolder = Join-Path $installPath "FIP-FS\Data\Engines\amd64\Microsoft"
                Remove-Item -Recurse -Force $microsoftFolder
            }
        }

        function EmptyMetadataFolder {
            Write-Host "$($env:COMPUTERNAME) Emptying metadata folder..."
            $installPath = Get-ExchangeInstallPath
            if ($null -ne $installPath) {
                $metadataFolder = Join-Path $installPath "FIP-FS\Data\Engines\metadata"
                Get-ChildItem $metadataFolder | Remove-Item -Recurse -Force
            }
        }

        function StartServices {
            Write-Host "$($env:COMPUTERNAME) Starting services..."
            Start-Service FMS
            Start-Service MSExchangeTransport
        }

        function StartEngineUpdate {
            Write-Host "$($env:COMPUTERNAME) Starting engine update..."
            $installPath = Get-ExchangeInstallPath
            $updateScriptPath = Join-Path $installPath "Scripts\Update-MalwareFilteringServer.ps1"
            $fqdn = [System.Net.Dns]::GetHostEntry([string]"localhost").HostName
            & $updateScriptPath $fqdn
        }

        function WaitForDownload {
            $percentComplete = 0
            do {
                Start-Sleep -Seconds 1
                $transfer = Get-BitsTransfer -AllUsers | Where-Object { $_.DisplayName -like "Forefront_FPS*" }
                if ($null -ne $transfer) {
                    if ($null -ne $transfer.BytesTotal -and
                        $null -ne $transfer.BytesTransferred -and
                        $transfer.BytesTotal.GetType() -eq [Int64] -and
                        $transfer.BytesTransferred.GetType() -eq [Int64] -and
                        $transfer.BytesTotal -gt 0) {
                        $percentComplete = ($transfer.BytesTransferred * 100 / $transfer.BytesTotal)
                    }

                    Write-Progress -Activity "$($env:COMPUTERNAME) Downloading scan engines" -Status "$($transfer.BytesTransferred) / $($transfer.BytesTotal)" -PercentComplete $percentComplete
                }
            } while ($null -ne $transfer)
        }
        #endregion Functions

        Add-PSSnapin -Name Microsoft.Exchange.Management.Powershell.E2010
        $hasMailboxRole = (Get-ExchangeServer ($env:COMPUTERNAME)).ServerRole -like "*Mailbox*"
        if ((-not $Force) -and (-not $hasMailboxRole)) {
            Write-Host "$($env:COMPUTERNAME) This server does not have the Mailbox role. Add -Force to proceed anyway."
            return
        }

        Add-PSSnapin -Name Microsoft.Forefront.Filtering.Management.PowerShell
        $engineInfo = Get-EngineUpdateInformation
        Write-Host "$($env:COMPUTERNAME) UpdateVersion: $($engineInfo.UpdateVersion)"
        $isImpacted = $engineInfo.UpdateVersion -like "22*"
        if ((-not $Force) -and (-not $isImpacted)) {
            Write-Host "$($env:COMPUTERNAME) This server is not impacted. Add -Force to proceed anyway."
            return
        }

        $succeeded = StopServicesAndProcesses
        if (-not $succeeded) {
            return
        }

        RemoveMicrosoftFolder
        EmptyMetadataFolder
        StartServices
        StartEngineUpdate
        WaitForDownload
    }
    #endregion Remoting Scriptblock
}
process {
    Invoke-Command -ScriptBlock $scriptBlock
}

Advanced 365 Mailbox management with MS Graph, Powershell, and JSON

Create Office 365 mailbox folders and advanced mailbox rules with Powershell and MS Graph

Recently, a request came through to create some email messaging processing for various Office 365 users, which involved creating some folder structure in mailboxes of a list of users, and creating a message rule that had some different criteria based on email message attributes.

The needs were:

  • Create a root folder
  • Create a folder inside that root folder
  • Create a rule:
    • Check the message Header for From address
    • Check for custom Header information
    • Move message to previously created subfolder
  • Finally, make sure there was no second mailbox rule created if already existed.

The New-MailboxFolder Powershell command works perfectly if the folder needed is for your own mailbox, if you want to run it against others, there is no current Powershell commandlet, so custom code must be created. While there are some basic examples out there, there was no comprehensive script anyone has published as of yet, so here is one I came up with.

For brevity purposes, I won’t go into detail the process that’s required to authenticate in order to run scripts against your environment, as there are quite a few resources available easily found by your favorite search engine, so I will skip over that process, and explain the “how to figure out what you need to accomplish with Powershell using MS Graph.”

$Mailboxes = @("userEmail.domain.com")
$Folders = @("RootFolder","OtherRootFolder")
$SubFolders = @("SubFolder")
$MailbRule = "RuleForSubFolder"

$AppId = "xxxxxxx-xxxx-xxxx-xxxx-xxxxxxxxxxx"
$AppSecret = "xxxxxxxxxxxxxxxxxxxxxxxxxxxxxxxxxxxxxxx"
$Scope = "https://graph.microsoft.com/.default"
$TenantName = "xxxxxxx-xxxx-xxxx-xxxx-xxxxxxxxxxx"

$Url = "https://login.microsoftonline.com/$TenantName/oauth2/v2.0/token"

Add-Type -AssemblyName System.Web

$Body = @{
    client_id = $AppId
	client_secret = $AppSecret
	scope = $Scope
	grant_type = 'client_credentials'
}

$PostSplat = @{
    ContentType = 'application/x-www-form-urlencoded'
    Method = 'POST'
    # Create string by joining bodylist with '&'
    Body = $Body
    Uri = $Url
}

$Request = Invoke-RestMethod @PostSplat

$Header = @{
    Authorization = "$($Request.token_type) $($Request.access_token)"
}

foreach($Mailbox in $Mailboxes) {

    $Uri = "https://graph.microsoft.com/v1.0/users/$Mailbox/mailFolders"
 
    $Mailboxfolders = Invoke-RestMethod -Uri $Uri -Headers $Header -Method Get -ContentType "application/json"
    $MailboxfoldersList = $Mailboxfolders.value.displayName
    $NextPage = $Mailboxfolders.'@Odata.NextLink'
   
    While($null -ne $NextPage) {
        $Mailboxfolders = Invoke-RestMethod -Uri $NextPage -Headers $Header -Method Get -ContentType "application/json"
        $MailboxfoldersList += $Mailboxfolders.value.displayName
        $NextPage = $Mailboxfolders.'@Odata.NextLink'
    }

    foreach($Folder in $Folders) {
        $Body = @"
        {
            "displayName": "$Folder"
        }
"@
        Write-Host "Mailbox: $Mailbox`nMailboxfolders: $($MailboxfoldersList)`nFolder wanted: $Folder"

        if($($MailboxfoldersList) -contains $Folder) {
            Write-Host "$Folder folder already found at mailbox $Mailbox, creating subfolder.`n"
            $UriParent = "https://graph.microsoft.com/v1.0/users/$Mailbox/mailFolders/?`$filter=displayname eq '$Folder'"
            $ParentFolder = Invoke-RestMethod -Uri $UriParent -Headers $Header -Method Get -ContentType "application/json"
            $UriSub = "https://graph.microsoft.com/v1.0/users/$Mailbox/mailFolders/$($ParentFolder.value.id)/childFolders"
        }

        else {
            $ParentFolder = Invoke-RestMethod -Uri $Uri -Headers $Header -Method Post -Body $Body -ContentType "application/json"
            Write-Host "Created new folder: $($ParentFolder.displayName) to mailbox $Mailbox!`n"
            $UriSub = "https://graph.microsoft.com/v1.0/users/$Mailbox/mailFolders/$($ParentFolder.value.id)/childFolders"
        }
    }
    
    $MailboxSubfolders = Invoke-RestMethod -Uri $UriSub -Headers $Header -Method Get -ContentType "application/json"
    $MailboxSubfoldersList = $MailboxSubfolders.value.displayName
    
    foreach($SubFolder in $SubFolders) {
        $Body2 = @"
        {
            "displayName": "$SubFolder"
        }
"@
        if($($MailboxSubfoldersList) -contains $Subfolder) {
            Write-Host "$Subfolder folder already found at mailbox $Mailbox.`n"
            $UriGetSub = "https://graph.microsoft.com/v1.0/users/$Mailbox/mailFolders/$($ParentFolder.value.id)/childFolders/?`$filter=displayname eq '$Subfolder'"
            $SubId = Invoke-RestMethod -Uri $UriGetSub -Headers $Header -Method Get -ContentType "application/json"
            
            $UriGetRules = "https://graph.microsoft.com/v1.0/users/$Mailbox/mailFolders/inbox/messageRules"

            $MailboxRules = Invoke-RestMethod -Uri $UriGetRules -Headers $Header -Method Get -ContentType "application/json"
            Write-Host "The rules are: $($MailboxRules.value.displayName)"
            $MailboxRulesList = $MailboxRules.value.displayName

            if($($MailboxRulesList) -contains "$MailbRule") {
                Write-Host "The mailbox rule $MailbRule already found at mailbox $Mailbox.`n"
                break
            }
            else {

                ## For syntax: https://developer.microsoft.com/en-us/graph/graph-explorer
                $RuleBody = @"
                {
                    "displayName": "$MailbRule",
                    "sequence": 2,
                    "isEnabled": true,
                    "conditions": {
                        "headerContains": [
                            "X-SomeCompany-tag: customTag"
                        ]
                    },
                    "actions": {
                        "moveToFolder": "$($SubId.id)",
                        "stopProcessingRules": true
                    },
                    "exceptions": {
                        "headerContains": [
                            "X-SomeCompany-Spam-Reason: eusafe",
                            "Reply-To: noreply@somedomain.com"
                        ]
                    }
                }
"@
                $RuleUri = "https://graph.microsoft.com/v1.0/users/$Mailbox/mailFolders/inbox/messageRules"
                $NewRule = Invoke-RestMethod -Uri $RuleUri -Headers $Header -Method Post -Body $RuleBody -ContentType "application/json"
                Write-Host "Created new Rule: $MailbRule in mailbox $Mailbox!`n"
            }
        }
        else {
            
            $NewSubfolder = Invoke-RestMethod -Uri $UriSub -Headers $Header -Method Post -Body $Body2 -ContentType "application/json"
            Write-Host "Created new subfolder: $($NewSubfolder.displayName) in $Folder to mailbox $Mailbox!`n"

            $RuleBody = @"
            {
                "displayName": "$MailbRule",
                "sequence": 2,
                "isEnabled": true,
                "conditions": {
                    "headerContains": [
                        "X-SomeCompany-tag: customTag"
                    ]
                },
                "actions": {
                    "moveToFolder": "$($NewSubfolder.id)",
                    "stopProcessingRules": true
                },
                "exceptions": {
                    "headerContains": [
                        "X-SomeCompany-Spam-Reason: eusafe",
                        "Reply-To: noreply@somedomain.com"
                    ]
                }
            }
"@
            $RuleUri = "https://graph.microsoft.com/v1.0/users/$Mailbox/mailFolders/inbox/messageRules"

            $NewRule = Invoke-RestMethod -Uri $RuleUri -Headers $Header -Method Post -Body $RuleBody -ContentType "application/json"
            Write-Host "Created new Rule: $MailbRule in mailbox $Mailbox!`n"
        }
    }
}

The key part of this article is not to show how fancy of a script I can write (disclaimer: the fancy spacing is from Visual Studio Code, use it!), but rather, how to get at the MS Graph API and syntax required to do the tremendous amount of capabilities that it’s got access to. I figured by throwing up a script that does quite a few different things that were previously only available if you ran several different scripts one after another (and hoped nothing broke), here’s an example of doing several different things easily using Powershell against the MS Graph API.

To see what JSON I needed, I used https://developer.microsoft.com/en-us/graph/graph-explorer extensively to see the fields to use, and looked up the REST API documentation to see what properties are required in the request body. (For example, for the Message Rule, I went to: https://docs.microsoft.com/en-us/graph/api/mailfolder-post-messagerules)

Logon failure with Azure AD DS based services

Fix a madding “Invalid password” error when trying to use an Azure service that uses Azure AD DS as it’s authentication

I hope this helps someone fix a madding “Invalid password” error when trying to use an Azure service that uses Azure AD DS as it’s authentication with a synced account from on-premise AD.

With a recent implementation of Windows Virtual Desktop, and interesting failure occurred with a set of users that were synchronized to Azure AD from an on-premise AD environment.

The environment was one where there was no longer an Azure AD Connect configuration in place, in fact, the on-premise AD environment was no longer available. All users were using Office 365 services without any issues, and Azure AD Domain Services was implemented for new Azure services, one of them being WVD.

All WVD services were tested with the admin account that created the resources, and some test users created in Azure AD, however, when the group that needed to use the service tried to use it with their accounts, around half the necessary users could not log into the VM image.

After verifying all permissions were correctly assigned, and checking to see if there were any relevant differences between the accounts that were able to log on vs. the ones that were not, I noticed that all accounts were able to log on to the web URL, however after the initial logon to the service, the originally synced accounts were failing with an “invalid password” error, whereas the ones that were directly created in Azure succeeded. – Aha! This pointed me to the fact that the accounts seemed to be having some sort of Azure ADDS failure, as 365 services were not dependent on that.

Quite a few articles were read all over the place, with none being any help, so I went back to the basics, and went over the Azure AD to Azure AD DS synchronization guide much more methodical than I previously had.

I’ll cut to the chase, in the middle of that guide, the following statement is made: When a user is created in Azure AD, they’re not synchronized to Azure AD DS until they change their password in Azure AD.

WVD – RDAgentBootLoader – Object reference not set to an instance of an object

This article is just a reminder to read event log errors carefully, as they tremendously help troubleshoot undocumented errors (which this blog is all about)

A Windows Virtual Desktop implementation kept having it’s Session host VMs randomly go to an Unavailable status, and after going through the full plethora of troubleshooting articles, I decided to take a closer look at the event error 3389:

Unable to retrieve DefaultAgent from registry: System.NullReferenceException: Object reference not set to an instance of an object.
   at RDAgentBootLoader.BootLoaderSettings.get_DefaultAgentPath() in S:\src\RDAgent\src\RDAgentBootloader\BootLoaderSettings.cs:line 82

The above error doesn’t say much, and is pretty cryptic, but when we look at the detail pane, we get some better information:

Log Name:      Application
Source:        RDAgentBootLoader
Date:          12/11/2020 10:21:05 AM
Event ID:      3389
Task Category: None
Level:         Error
Keywords:      Classic
User:          N/A
Computer:      lis-wvd-0.xxxxxxx.com
Description:
Unable to retrieve DefaultAgent from registry: System.NullReferenceException: Object reference not set to an instance of an object.
   at RDAgentBootLoader.BootLoaderSettings.get_DefaultAgentPath() in S:\src\RDAgent\src\RDAgentBootloader\BootLoaderSettings.cs:line 82
Event Xml:
<Event xmlns="http://schemas.microsoft.com/win/2004/08/events/event">
  <System>
    <Provider Name="RDAgentBootLoader" />
    <EventID Qualifiers="0">3389</EventID>
    <Version>0</Version>
    <Level>2</Level>
    <Task>0</Task>
    <Opcode>0</Opcode>
    <Keywords>0x80000000000000</Keywords>
    <TimeCreated SystemTime="2020-12-11T15:21:05.2207218Z" />
    <EventRecordID>10136</EventRecordID>
    <Correlation />
    <Execution ProcessID="0" ThreadID="0" />
    <Channel>Application</Channel>
    <Computer>lis-wvd-0.xxxxxxxx.com</Computer>
    <Security />
  </System>
  <EventData>
    <Data>Unable to retrieve DefaultAgent from registry: System.NullReferenceException: Object reference not set to an instance of an object.
   at RDAgentBootLoader.BootLoaderSettings.get_DefaultAgentPath() in S:\src\RDAgent\src\RDAgentBootloader\BootLoaderSettings.cs:line 82</Data>
  </EventData>
</Event>

The first thing that stood out to me was “Unable to retrieve DefaultAgent from registry“, and after a quick search to see where that registry key was, I found it at: \HKLM\SOFTWARE\Microsoft\RDAgentBootLoader

Looking at my settings, I saw the “DefaultAgent” is pointing to an entry version that is not in my registry:

Hmm…. if it’s pointing to a version that there’s no key, let me check if the binaries are there on the machine. Yes, they were! So let me try creating the missing key by checking to see what was in the existing key:

Ok, let’s create the missing key in the same syntax as the existing one:

After a restart, the session hosts are now Available and stable!

Azure FQDN support for site-to-site VPN

As of November 20, 2020, Azure now supports FQDN configurations for it’s VPN connections!

This is perfect for customer branches or locations without static public IP addresses (private homes behind a cable modem, etc.) to connect to the Azure VPN gateways. Dynamic DNS services can be leveraged to use the Fully Qualified Domain Name (FQDN) instead of IP addresses!

https://docs.microsoft.com/en-us/azure/vpn-gateway/vpn-gateway-howto-site-to-site-resource-manager-portal#LocalNetworkGateway